Build Your First RAG App with Spring AI – Complete Beginner’s Guide
Build Your First RAG App with Spring AI : If you have played around with any AI chatbot, you must have faced this problem at least once. You ask something specific about your own company, and the chatbot replies with full confidence… but the answer is completely wrong. This is called hallucination, and today we are going to fix this problem using a technique called RAG.
In this post I am going to explain RAG in the simplest way possible, and then we will build a working RAG application from scratch using Spring Boot and Spring AI. I have also made a full video on this topic, you can watch it here:
This article belongs to my Spring AI category, so if you like this kind of content, do check out the other posts there too.
First, What is RAG?
Let’s take a simple example. Imagine you have built an AI chatbot for your organization, and you ask it: “What is the leave policy of my organization?” And it replies with full confidence, but with completely fake information.
So what do you think happened here? Is the AI model not capable of answering it? Or is your code wrong?
No, that is not the case at all.
The real reason is simple. You are asking a question related to your company, but these LLM models are trained only on public data. They don’t know anything about your internal data, your documents, your PDFs, nothing. So it still replies, but the reply is completely fake. And that is what we call hallucination.
And the cure for this problem is RAG, which stands for Retrieval Augmented Generation.
Understanding RAG with a Simple Story
Let’s imagine AI is a very smart student. This student has access to billions of pages on the internet — textbooks, repositories, Wikipedia, articles, basically whatever is publicly available. But the moment you ask this student something about your company’s private data, data that is not public, the student will simply hallucinate. It will still give you an answer, but that answer may be correct or completely wrong.
Now imagine you create a private library. This library contains all the documents related to your company. And you give this AI student access to your private library.
So next time, whenever this AI student needs to answer something, it will first go inside the library, scan all the documents, read them carefully, and only then it will construct the final answer.
Now let’s map this story back to RAG terms:
- The private library where you store all your data — this is nothing but a database, or more precisely, a vector database, where your documents are stored in the form of chunks.
- The AI student going inside the library and finding similar, relevant documents — this is called semantic search.
- Picking up the relevant pages based on the query — this is the retrieval process.
- The AI student itself is the actual LLM model.
And this whole process — starting from the library, going through every shelf, finding the relevant document and retrieving it — all of this together is commonly called RAG.
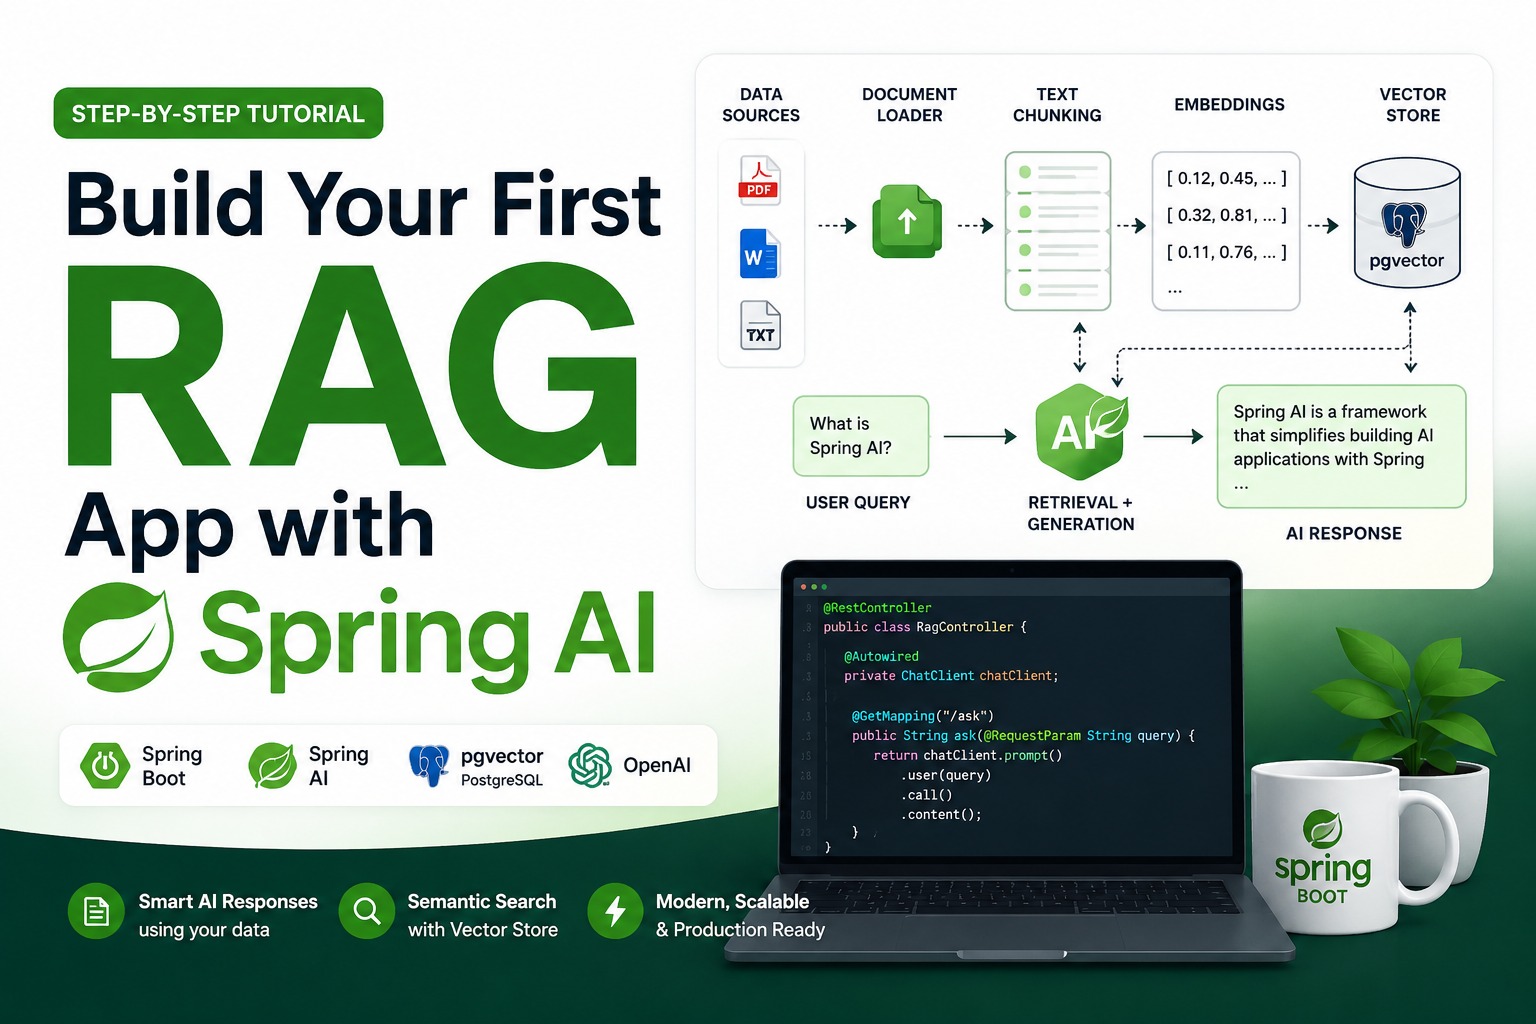
RAG Architecture — Two Pipelines
Before jumping into the code, it is important to understand that RAG has two separate pipelines.
1. Ingestion Pipeline
This pipeline runs only once, when you load your application. In this pipeline you load your company related data and store it in the database. The steps are:
- Load your document — it can be a PDF, a text file, or any company manual.
- Split the document into chunks — because if you upload a 50-page PDF directly, it becomes a huge document. It will take a lot of memory, and when your model uses it, it will cost you a lot of tokens too. So splitting into smaller chunks is important.
- Pass the chunks to an embedding model — the embedding model converts the text chunks into numbers, so that the machine can understand and compare them properly.
- Store these numbers (vectors) in a vector database.
That’s the entire ingestion pipeline, and it runs only once at application startup.
2. Query Pipeline
This pipeline runs every single time a user asks a question. Let’s go back to our leave policy example:
- The user asks: “What is the leave policy of my organization?”
- This question goes to the embedding model, which converts the question into numbers.
- Using these numbers, we search the vector database for relevant details.
- Once we find the relevant documents, we do prompt augmentation — meaning we inject those relevant documents as context into the prompt.
- Finally, this enriched prompt goes to the LLM model, and now the LLM understands your question along with the actual company data, so it gives a much more accurate response.
This is the complete query pipeline, and it runs every time a user asks something.
Tech Stack We Are Using
For this project, here is what we used:
- Spring Boot 3.x+
- Spring AI
- OpenAI — for the LLM model, since we are connecting with OpenAI
- Maven project
- JDK 21
- PGVector — this is our vector database
We created the initial project using Spring Initializer.
Step 1: pom.xml Dependencies
We are using Spring Boot version 3.5.3 and Java 21. We are also using the BOM model for Spring AI, version 1.1.0. Below is the complete pom.xml with all the dependencies you need — Spring Web, PGVector, OpenAI, PostgreSQL driver, and the advisors dependency (this last one is important, we will talk about it later).
<?xml version="1.0" encoding="UTF-8"?>
<project xmlns="http://maven.apache.org/POM/4.0.0"
         xmlns:xsi="http://www.w3.org/2001/XMLSchema-instance"
         xsi:schemaLocation="http://maven.apache.org/POM/4.0.0
         https://maven.apache.org/xsd/maven-4.0.0.xsd">

	<modelVersion>4.0.0</modelVersion>

	<parent>
		<groupId>org.springframework.boot</groupId>
		<artifactId>spring-boot-starter-parent</artifactId>
		<version>3.5.3</version>
		<relativePath/>
	</parent>

	<groupId>com.demo</groupId>
	<artifactId>ragapi</artifactId>
	<version>0.0.1-SNAPSHOT</version>

	<properties>
		<java.version>21</java.version>
		<spring-ai.version>1.1.0</spring-ai.version>
	</properties>

	<dependencyManagement>
		<dependencies>
			<dependency>
				<groupId>org.springframework.ai</groupId>
				<artifactId>spring-ai-bom</artifactId>
				<version>${spring-ai.version}</version>
				<type>pom</type>
				<scope>import</scope>
			</dependency>
		</dependencies>
	</dependencyManagement>

	<dependencies>

		<!-- Web -->
		<dependency>
			<groupId>org.springframework.boot</groupId>
			<artifactId>spring-boot-starter-web</artifactId>
		</dependency>

		<!-- OpenAI -->
		<dependency>
			<groupId>org.springframework.ai</groupId>
			<artifactId>spring-ai-starter-model-openai</artifactId>
		</dependency>

		<!-- PGVector -->
		<dependency>
			<groupId>org.springframework.ai</groupId>
			<artifactId>spring-ai-starter-vector-store-pgvector</artifactId>
		</dependency>

		<!-- PostgreSQL -->
		<dependency>
			<groupId>org.postgresql</groupId>
			<artifactId>postgresql</artifactId>
			<scope>runtime</scope>
		</dependency>

		<dependency>
			<groupId>org.springframework.ai</groupId>
			<artifactId>spring-ai-advisors-vector-store</artifactId>
		</dependency>

		<!-- DevTools -->
		<dependency>
			<groupId>org.springframework.boot</groupId>
			<artifactId>spring-boot-devtools</artifactId>
			<scope>runtime</scope>
			<optional>true</optional>
		</dependency>

		<!-- Tests -->
		<dependency>
			<groupId>org.springframework.boot</groupId>
			<artifactId>spring-boot-starter-test</artifactId>
			<scope>test</scope>
		</dependency>

	</dependencies>

	<build>
		<plugins>

			<plugin>
				<groupId>org.springframework.boot</groupId>
				<artifactId>spring-boot-maven-plugin</artifactId>
			</plugin>

		</plugins>
	</build>

</project>
Step 2: application.properties
Now, since we are going to connect with an LLM model, we need to add the OpenAI configuration. Along with that, we need the database configuration too. Here is the complete file:
spring.application.name=ragapi

# ——— OpenAI ———
spring.ai.openai.api-key=code
spring.ai.openai.chat.options.model=gpt-4o-mini
spring.ai.openai.embedding.options.model=text-embedding-ada-002

# PostgreSQL
spring.datasource.url=jdbc:postgresql://localhost:5433/postgres
spring.datasource.username=postgres
spring.datasource.password=postgres

# PGVector
spring.ai.vectorstore.pgvector.initialize-schema=true

# ——— Debug: see what Spring AI is doing under the hood ———
logging.level.org.springframework.ai=DEBUG
A few things to note here:
- The first section is for OpenAI configuration. You need to put your own OpenAI API key here. If you want to use some other model like Gemini or Claude, you will have to add its respective configuration instead.
- We are using the gpt-4o-mini model for chat, and text-embedding-ada-002 for the embedding model.
- Then we provide the usual JDBC connectivity details — URL, username, password.
- Since we are using PGVector, the
spring.ai.vectorstore.pgvector.initialize-schema=trueline is needed. - The debug logging line is completely optional, you can add it if you want to see what is happening internally.
To get PGVector running, the easiest way is to run it as a Docker container. Once it’s running, your application will be able to connect with this database on startup.
Step 3: Loading Your Private Document (Ingestion Config)
Now that our database is up and running, the next step is loading your company related document, or whatever private document you want to pass to the LLM model.
For this we created a config class called IngestionConfig. Inside this class, we have an ingest method which takes the vector store and the embedding model as parameters, and this method is responsible for loading the document into the vector database.
package com.demo.ragapi.config;

import org.springframework.ai.document.Document;
import org.springframework.ai.embedding.EmbeddingModel;
import org.springframework.ai.reader.TextReader;
import org.springframework.ai.transformer.splitter.TokenTextSplitter;
import org.springframework.ai.vectorstore.VectorStore;
import org.springframework.boot.CommandLineRunner;
import org.springframework.context.annotation.Bean;
import org.springframework.context.annotation.Configuration;
import org.springframework.core.io.ClassPathResource;

import java.util.List;

@Configuration
public class IngestionConfig {

    @Bean
    CommandLineRunner ingest(
            VectorStore vectorStore,
            EmbeddingModel embeddingModel) {

        return args -> {

            // STEP 1: Load the document
            var resource = new ClassPathResource("docs/manual.txt");
            var reader   = new TextReader(resource);

            // STEP 2: Split into chunks
            var splitter = new TokenTextSplitter();
            List<Document> chunks = splitter.apply(reader.get());

            // STEP 3: Embed + Store
            vectorStore.add(chunks);

            System.out.println("📚 Ingested " + chunks.size()
                    + " chunks into PGVector. Library is stocked!");
        };
    }
}
Let’s break this down line by line:
- Step 1 loads the document from
src/main/resources/docs/manual.txt. So inside your resources folder, you need to create adocsfolder, and inside that folder, amanual.txtfile. If your data is coming from cloud storage or some other location, you will need to configure that separately. - Step 2 splits the document into chunks using
TokenTextSplitter. This is the chunking step we talked about in the architecture. - Step 3 uses the embedding model (configured via
spring.ai.openai.embedding.options.model) to convert those chunks into numbers, and stores them directly into the vector store, which is our PGVector database.
For the actual manual.txt file, I pasted a leave policy of a sample organization — annual leave, sick leave, casual leave, maternity leave, and a bunch of other company policies. This is exactly the kind of private data that a public LLM would never know about on its own.
Step 4: The Chat Controller
Now we need a controller to actually accept a query from the user. So we created a ChatController class, and inside this class we have a ChatClient object through which we talk to the model.
package com.demo.ragapi.controller;

import org.springframework.ai.chat.client.ChatClient;
import org.springframework.ai.chat.client.advisor.vectorstore.QuestionAnswerAdvisor;
import org.springframework.ai.vectorstore.VectorStore;
import org.springframework.web.bind.annotation.GetMapping;
import org.springframework.web.bind.annotation.RequestMapping;
import org.springframework.web.bind.annotation.RequestParam;
import org.springframework.web.bind.annotation.RestController;

@RestController
@RequestMapping("/chat")
public class ChatController {

    private final ChatClient chatClient;
    private final VectorStore vectorStore;

    public ChatController(
            ChatClient.Builder builder,
            VectorStore vectorStore) {
        this.chatClient  = builder.build();
        this.vectorStore = vectorStore;
    }

    @GetMapping
    public String chat(@RequestParam String message) {

        return chatClient
                .prompt()
                .user(message)
                .advisors(QuestionAnswerAdvisor.builder(vectorStore).build())  // ← THE ONE LINE
                .call()
                .content();
    }
}
Here is the important part. The single line that actually turns a plain chatbot into a RAG powered chatbot is this one:
.advisors(QuestionAnswerAdvisor.builder(vectorStore).build())
This QuestionAnswerAdvisor is where all the magic happens. It goes to the vector database, fetches the details relevant to your query, and injects that context into the final response. Note that to use this advisor, you need the spring-ai-advisors-vector-store dependency in your pom.xml, otherwise you will get an error while importing this class.
Step 5: Testing Without RAG First
Before wiring everything up, it’s a good idea to see how the model behaves without the private library connected. I made a simple GET request in Postman, hitting the /chat endpoint with the query param message=What is our company leave policy.
At this stage, the controller was directly calling the chat client without any advisor, so it was hitting the model directly. And the response was something like:
“I’m not able to provide you more accurate information about your company leave policy. I recommend checking your employee handbook or the company’s HR resources.”
This is actually a decent answer, not hallucination, because the model is honest enough to say it doesn’t know. But it’s still not useful for our actual use case, because we want the model to know about our real leave policy.
Step 6: Testing With RAG — The Real Magic
Now once we added the QuestionAnswerAdvisor line and connected the vector store, I hit the exact same request again with the exact same question — “What is our company leave policy?”
And this time, the response actually listed out the real leave types from our manual.txt file — annual leave, sick leave, casual leave, maternity leave, and so on, exactly as defined in our document.
This is the real proof that RAG is working. The model is no longer guessing. It is now fetching the actual document from our vector database, injecting it as context, and only then generating the final response.
Wrapping Up
So to summarize everything in one line: RAG is simply the process of giving your AI model access to a private library (vector database), so that instead of guessing an answer, it first goes and reads the relevant documents, and then generates the response.
We covered the full ingestion pipeline (load, split, embed, store) which runs once, and the query pipeline (embed query, search, augment prompt, get response) which runs on every single user question. And then we built the actual Spring AI project step by step, using OpenAI and PGVector, and saw with our own eyes how the same question gave a completely different, accurate answer once RAG was hooked up.
If you have any doubts about any of this, feel free to drop a comment. And if this helped you, please share it with your friends and subscribe to my channel for more Spring AI content.
More Spring AI articles: codespy.org/category/spring-ai