Build an MCP Client with Spring AI – Step by Step Guide
Build an MCP Client with Spring AI: In the last post, we built an MCP Server with three Jira tools — get open tickets, create ticket, and update ticket status. But a server sitting alone is not useful to anyone. Somebody needs to actually talk to it. That “somebody” is the MCP client, and that’s exactly what we are building today.
More posts in this series: codespy.org/category/spring-ai
What We’re Building
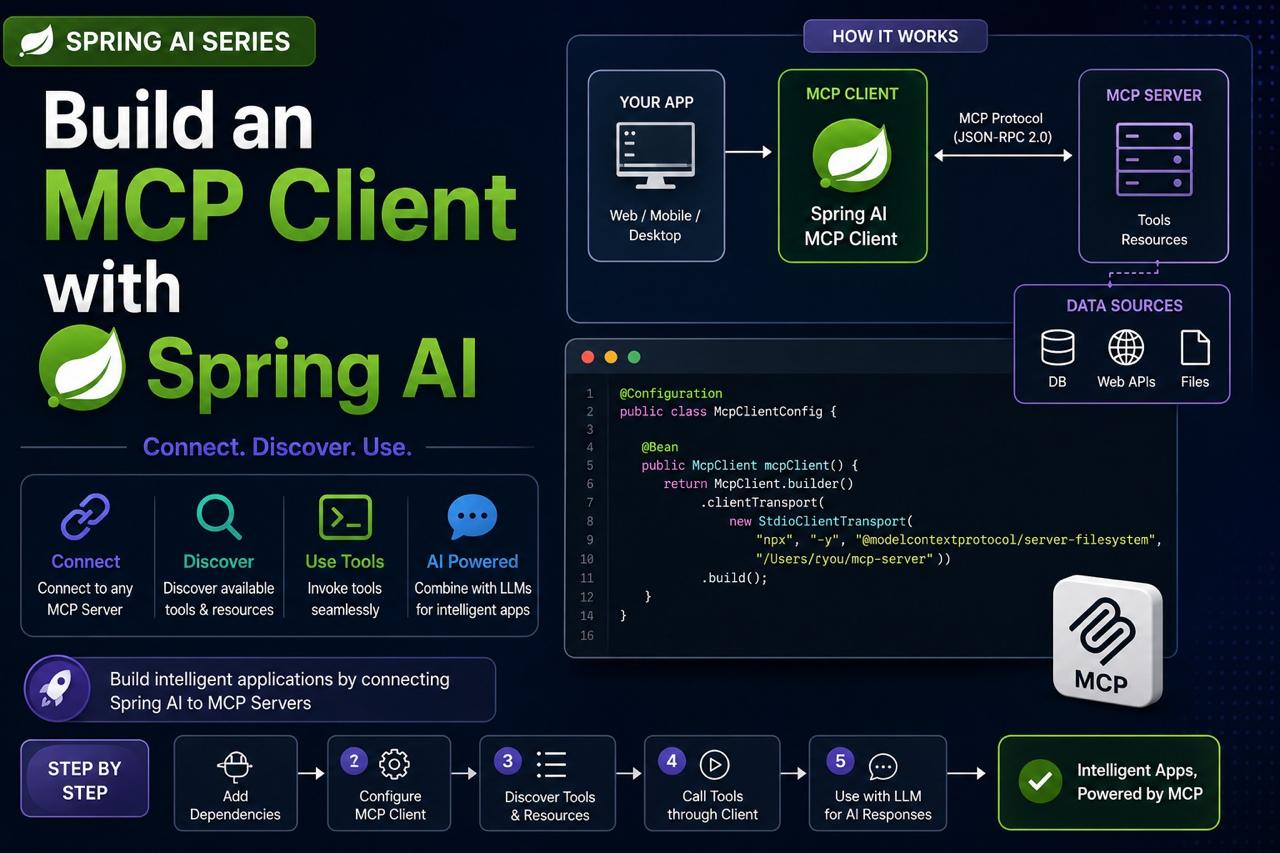
We already have our MCP server ready from the last post. In this post, we are going to create an MCP client project, and then connect this MCP client, or you can say our host application, to that MCP server. Once connected, whenever a user asks something related to Jira, this client will talk to the server, get the response, and hand it back to the user.
Tech Stack
Same base setup as the server:
- Java 21
- Spring AI 2.0.0-RC1
- Spring Boot Starter Web
The difference is in two dependencies. On the server side, we used spring-ai-starter-mcp-server. Here, on the client side, we use spring-ai-starter-mcp-client. And since the client is also our host application, it is the one that actually defines and connects to the AI model. In our case, that’s OpenAI, so we add the OpenAI dependency too.
Apart from these two, every other dependency stays the same between server and client. And if you’re integrating with a real external system — like an actual Jira REST API instead of our stub methods — that configuration would go on the MCP server side, not here.
Step 1: pom.xml
Notice we don’t define explicit versions for these dependencies, because we are using the Spring AI BOM.
<?xml version="1.0" encoding="UTF-8"?>
<project xmlns="http://maven.apache.org/POM/4.0.0" xmlns:xsi="http://www.w3.org/2001/XMLSchema-instance"
	xsi:schemaLocation="http://maven.apache.org/POM/4.0.0 https://maven.apache.org/xsd/maven-4.0.0.xsd">
	<modelVersion>4.0.0</modelVersion>
	<parent>
		<groupId>org.springframework.boot</groupId>
		<artifactId>spring-boot-starter-parent</artifactId>
		<version>4.0.6</version>
		<relativePath/> <!-- lookup parent from repository -->
	</parent>
	<groupId>com.example</groupId>
	<artifactId>mcpclient</artifactId>
	<version>0.0.1-SNAPSHOT</version>
	<name/>
	<description/>
	<url/>
	<licenses>
		<license/>
	</licenses>
	<developers>
		<developer/>
	</developers>
	<scm>
		<connection/>
		<developerConnection/>
		<tag/>
		<url/>
	</scm>
	<properties>
		<java.version>21</java.version>
		<spring-ai.version>2.0.0-RC1</spring-ai.version>
	</properties>
	<dependencies>
		<dependency>
			<groupId>org.springframework.boot</groupId>
			<artifactId>spring-boot-starter-web</artifactId>
		</dependency>
		<dependency>
			<groupId>org.springframework.ai</groupId>
			<artifactId>spring-ai-starter-mcp-client</artifactId>
		</dependency>

		<!-- OpenAI -->
		<dependency>
			<groupId>org.springframework.ai</groupId>
			<artifactId>spring-ai-starter-model-openai</artifactId>
		</dependency>
	</dependencies>
	<dependencyManagement>
		<dependencies>
			<dependency>
				<groupId>org.springframework.ai</groupId>
				<artifactId>spring-ai-bom</artifactId>
				<version>${spring-ai.version}</version>
				<type>pom</type>
				<scope>import</scope>
			</dependency>
		</dependencies>
	</dependencyManagement>

	<build>
		<plugins>
			<plugin>
				<groupId>org.springframework.boot</groupId>
				<artifactId>spring-boot-maven-plugin</artifactId>
			</plugin>
		</plugins>
	</build>

</project>
Step 2: The Chat Controller — Where the Real Magic Happens
Next, we create a ChatController. Since this client is also acting as our host application, this is the controller that will actually receive the request from the user.
package com.example.mcpclient.client;

import org.springframework.ai.chat.client.ChatClient;
import org.springframework.ai.mcp.SyncMcpToolCallbackProvider;
import org.springframework.web.bind.annotation.*;

@RestController
@RequestMapping("/chat")
public class ChatController {

  private final ChatClient chatClient;

  public ChatController(ChatClient.Builder builder,
                          SyncMcpToolCallbackProvider mcpTools) {
    this.chatClient = builder
        .defaultTools(mcpTools)
        .build();
  }

  @GetMapping
  public String chat(@RequestParam String message) {
    return chatClient.prompt().user(message).call().content();
  }
}
Here we create a ChatClient which connects to the OpenAI model and gives us back a response. But the real star of this class is SyncMcpToolCallbackProvider.
If you remember from when we discussed the MCP architecture, this class is used to scan all the tools available on the MCP server, and register them into a discovery layer. In simple words, it makes those server-side tools ready to be used by the chat client, based on whatever the user is asking.
So if a user asks something like “get open tickets”, this provider makes sure the chat client knows a tool exists for that, fetches the actual details from the MCP server, and returns the response back to the user.
Notice this one line inside the constructor:
this.chatClient = builder
    .defaultTools(mcpTools)
    .build();
This single line registers all the server-side MCP tools (our Jira tools) directly with the OpenAI model, or more precisely, with the chat client. After this line, your AI model becomes fully aware of the Jira service tools that live on the MCP server, even though it never talks to Jira directly.
And once the MCP client is able to communicate with the MCP server, this one line is all you need — you don’t have to write any extra logic to decide which tool to call, or how to call it. That’s really the beauty of Spring AI here. A single line quietly removes a ton of complexity that you’d otherwise have to hand-write yourself.
Step 3: application.properties — Connecting Client to Server
The MCP server exists and is ready, but the MCP client still has no idea it exists. We need to explicitly configure that connection.
spring.application.name=mcpclient

spring.ai.openai.api-key=oauth_token
spring.ai.openai.chat.model=gpt-4o-mini

spring.ai.mcp.client.stdio.connections.jira.command=java
spring.ai.mcp.client.stdio.connections.jira.args[0]=-jar
spring.ai.mcp.client.stdio.connections.jira.args[1]=C:/Users/strcp/git/mcpserver/target/mcpserver-0.0.1-SNAPSHOT.jar

logging.level.org.springframework.ai.mcp=DEBUG
Let’s break this down:
spring.ai.openai.api-keyandspring.ai.openai.chat.model— since we are connecting with the OpenAI model, we need to provide the API key and specify which chat model to use, here it’sgpt-4o-mini.spring.ai.mcp.client.stdio.connections.jira.*— this is where we configure the client to connect with our MCP server using stdio. We give this connection a name,jira, and under it we define the actual command needed to run that server. The command is simplyjava, and the arguments are-jarfollowed by the full path to the MCP server jar file we built in the previous post.
This is exactly the point from the last video — you don’t need to run the MCP server separately as its own running application. You just point the client to the server’s jar file, and the client takes care of starting and talking to it over stdio.
logging.level.org.springframework.ai.mcp=DEBUG— this is optional, but very useful. It lets you see all the MCP related logs, including which tools got registered, right in your console.
Once all these properties are in place, your client is fully ready to connect with the server.
Step 4: Seeing the Connection Work
When you start the application, you’ll see logs saying the MCP server is starting, then that it has started, and eventually something like “registered tools: 3”. If you go back and check our JiraToolsService on the server, you’ll remember we defined exactly three tools — get open tickets, create ticket, and update ticket status. So seeing “3” here confirms your client successfully discovered and registered all three tools from the server.
Under the hood, remember that MCP client and server don’t talk in plain English. They communicate using the JSON-RPC protocol — every message defines a method, a JSON-RPC version, and a params object carrying the actual data.
Step 5: Testing With Postman
Now that our server is ready, our client is ready, and the host application is wired up, it’s time to actually test this end to end using Postman.
Test 1 — Get open tickets
We send a GET request to /chat with the message: “What are the open bugs in project PROJECT?”
This should route to our getOpenTickets tool on the MCP server. And that’s exactly what happens — we get back a response listing three open tickets, each with its ticket ID, summary, assignee, and priority. This matches exactly what we hardcoded in getOpenTickets on the server side.
Test 2 — Create a ticket
Next, we ask something like: “Log a bug ticket for the login timeout issue in the project.”
This should trigger the createTicket tool. And sure enough, the response comes back saying a bug ticket has been created for the login timeout issue, with the new ticket ID PROJECT-104 — exactly what our stub method returns.
Test 3 — Update ticket status
Finally, we test the third tool by asking something like: “Mark ticket PROJECT-102 as done.”
This should call updateTicketStatus. And the response confirms it — the ticket has been successfully marked as done.
All three tools — get, create, and update — are working exactly as expected, purely through natural language questions, without us writing any manual routing logic ourselves. This is the real power of MCP: the model figures out which tool to call, just by reading the tool descriptions we wrote on the server.
Wrapping Up
So that’s the full picture. In the last post we built the MCP server with three Jira tools. In this post, we built the MCP client, wired it to OpenAI as our host application, connected it to the server over stdio using spring.ai.mcp.client.stdio.connections, and registered all the server’s tools into the chat client using SyncMcpToolCallbackProvider and .defaultTools(mcpTools). Then we tested all three flows in Postman and confirmed everything works end to end.
That’s the complete MCP client-server story with Spring AI — a clean separation where your AI model doesn’t need to know anything about Jira directly, it just knows how to ask the right tool for the right job.
If you have any doubts, drop a comment. And if this helped you, please share it with your friends.
More Spring AI articles: codespy.org/category/spring-ai